creating a simple vulnerable Driver and learning how to kill EDR's

learning how rootkits work using a BYOVD scenario
all the codes can be found here: https://github.com/hamoon12345/rootkits
so in today’s research we are going to learn what RootKits are used for and why they are so much dangerous and why rootkits are less of a menace nowadays. so grab you’re beer and just learn
A small look at kernel driver developing
so for you to understand this research properly you should first know how drivers work in kernel and how we can develope them. the best source here is the Pavel Yosifovich - Windows Kernel Programming . but for the sake of the research and just giving a quick knowledge on how the drivers work im gonna explain some fundamentals about kernel drivers
1. The Execution Environment (Ring 0)
Drivers run in kernel mode (x86 Ring 0). where they have unrestricted access to hardware and memory. and because of this any error or exception in drivers can potentially cause BSOD (infamous Blue screen of death)
2. The Driver Entry Point & Unload
every driver has Entry function just like main function when you are coding. it does The main initialization routine. Its primary job is to populate the Driver Object with function pointers to your Dispatch Routines. driverUnload: Must be explicitly set in DriverEntry If missing whenever you try to unload you’re driver it would cause a leak in the kernel and this will not cleanup untill you actually reboot you’re system
3. The I/O Request Packet (IRP) (simply requests in the eyes of driver)
User-mode calls (ReadFile, WriteFile, DeviceIoControl) are converted by the I/O Manager into IRPs. These are heavyweight data structures describing the operation. and when you’re driver receives an IRP:
- it will Process it.
- it will Call
IoCompleteRequestto signal completion back to the I/O Manager. - and it will Return an NTSTATUS code (e.g., STATUS_SUCCESS:0x00000000).
4. Dispatch Routines (The Switchboard)
Think of a driver like a reception desk in a busy office.
1
Dispatch Routines are just the different receptionists sitting at that desk, each trained to handle one specific type of request.
When a user-mode app wants to talk to your driver, it sends a request (an IRP). That request has a “type” stamped on it (e.g., “READ”, “WRITE”, or “CUSTOM_COMMAND”).
Inside your driver, you have a simple switchboard (an array of function pointers). When a request arrives, the Windows I/O Manager looks at the “type” stamp and instantly routes it to the correct receptionist (your function) to handle it.
The only two you really care about:
1
```IRP_MJ_READ``` – Handles requests to read data from the driver.
IRP_MJ_WRITE – Handles requests to send data to the driver.
You must set IRP_MJ_CREATE and IRP_MJ_CLOSE if you want apps to successfully open a handle to your device (CreateFile). If you leave those unset, CreateFile will also fail with that same error, and no other communication (READ/WRITE/IOCTL) will ever reach your driver because the app can’t even get a handle to talk to you!
5. IRQL (Interrupt Request Level)
This is the #1 cause of crashes in new driver development. The CPU runs at different priority levels:
1
2
3
4
5
6
7
PASSIVE_LEVEL (0): Normal thread execution. Can call paged memory and Win32 APIs (e.g., ZwCreateFile).

APC_LEVEL (1): Asynchronous Procedure Calls. Can still access paged memory (carefully).

DISPATCH_LEVEL (2): Interrupts and DPCs. Critical Rule: You CANNOT access pageable memory (must use NonPagedPool), and you CANNOT wait for events/semaphores. If you touch a page fault here, instant BSOD.

DIRQL (3+): Direct Hardware Interrupts. Extremely restricted.
THREAD_PRIORITY_LOWEST (-2), THREAD_PRIORITY_BELOW_NORMAL (-1), THREAD_PRIORITY_- NORMAL (0), THREAD_PRIORITY_ABOVE_NORMAL (+1), THREAD_PRIORITY_HIGHEST (+2)
6. Paged vs. Non-Paged Pool
Think of your driver as a chef in a busy kitchen (the CPU).
The chef has two places to store ingredients (memory):
Non-Paged Pool (The Countertop) This is the small, expensive counter space right next to the stove.
The rule: Whatever goes here must stay here permanently. It never gets put away in the fridge or basement.
The perk: The chef can grab it instantly, no matter how busy or frantic things get (even at high IRQLs).
The cost: It takes up physical RAM forever, so you can’t waste it
Paged Pool (The Basement Fridge) This is the huge, cheap storage basement.
The rule: If the chef isn’t using something, Windows sends it down to the basement (the page file on your hard drive) to free up physical RAM.
The perk: It saves a ton of physical memory, so you can allocate huge chunks.
The catch: To use it, the chef has to run downstairs to get it (this is called a page fault).
If your driver tries to access the “Basement Fridge” (Paged Pool) while at that high priority, Windows says “You can’t go get that right now!” and instantly crashes the whole system with a BSOD (specifically, IRQL_NOT_LESS_OR_EQUAL).
Data accessed at high speed / high IRQL (like interrupt handlers or spinlocks) MUST go in Non-Paged Pool.
Everything else (like big buffers or settings loaded once at startup) can safely live in Paged Pool to save memory.
accessing data from non-paged pool is always safe, whereas accessing data from paged pool or from user-supplied buffers is not safe and should be avoided.
7. how does stack expands in user mode?
well before that you should first learn about page states:
Free
- Neither reserved nor committed.
- Not accessible. Any read/write produces an access violation.
- Available for future reservation or commitment (or both at once).
- Released back to Free with
VirtualFree(MEM_RELEASE).
Reserved
- Address range has been claimed inside the process so no other allocation in the same process can take those virtual addresses.
- No physical storage (RAM or pagefile) is associated yet.
- Pages remain inaccessible.
- Useful for large contiguous regions that will be filled later (e.g., sparse arrays, heaps that grow).
- Can later be committed with a second
VirtualAlloccall (MEM_COMMIT). - Decommitting returns pages to Reserved; full release returns them to Free.
Committed
- Address range is backed by the system commit charge (RAM + pagefile).
- Memory is now accessible (subject to protection flags: PAGE_READWRITE, PAGE_EXECUTE_READ, etc.).
- Physical pages are allocated on first touch (demand-zero or from pagefile).
- Contributes to the process Private Bytes / Commit Size and to the system-wide Commit Charge.
- When the process exits (or explicit
VirtualFreewith MEM_DECOMMIT / MEM_RELEASE), the backing is released.
stack expansion:
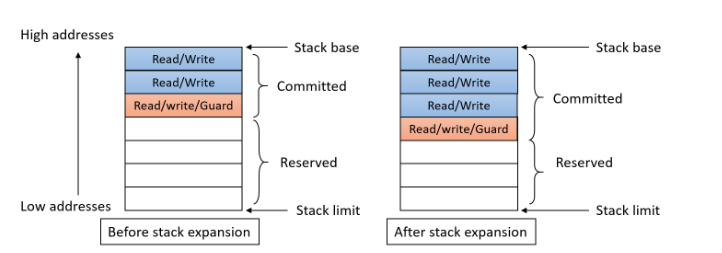
it starts out with a certain amount of committed memory (could be as small as a single page), where the next page is committed with a PAGE_GUARD attribute to catch Stack Overflows. and the rest of the pages are reserved. and then it will try to access the next page which has PAGE_GUARD and this would cause a PAGE_GUARD exception so in this level the memory manager would remove the page guard and will commit the page.
# BYOVD scenario
Why rootkits are less of a menace nowadays
Microsoft locked down the kernel (PatchGuard & HVCI)
Back in the XP days you could hook the SSDT or modify kernel structures freely. On modern x64 systems PatchGuard actively bugchecks the machine if it detects tampering with critical kernel structures. Add HVCI (Hypervisor-protected Code Integrity) and VBS (Virtualization-Based Security) and the kernel is effectively locked down for unsigned or shady drivers. A random kernel driver that tries classic hooks will trigger a bugcheck almost immediately.Driver signing is mandatory
You cannot load a kernel driver without a valid EV (Extended Validation) certificate. Getting one requires a background check and real money. If Microsoft blacklists the cert you are done. Stealing certs gets them burned fast. Loading a pure custom rootkit into the kernel has become a high-cost, high-risk operation.Attackers moved to “Bring Your Own Driver” (BYOVD)
Why write a complex, crash-prone rootkit when you can abuse a legitimate, signed driver that already has kernel access (Gigabyte, MSI, Capcom, various anti-cheat or AV helper drivers, etc.)? Attackers load these vulnerable but signed drivers and use their exposed IOCTLs to kill EDRs or disable protections. It is easier, stealthier, and does not require writing your own kernel code from scratch.
Our scenario
In this research we design a deliberately vulnerable driver named vessel, load it, and then use a user-mode client to perform classic rootkit operations (process hiding, PPL elevation, debug-port stripping, process killing) against EDR processes. The goal is educational: show exactly how these techniques work when you have arbitrary kernel read/write and call primitives.
Vessel – the vulnerable driver
The driver creates \Device\Vessel and a symbolic link \DosDevices\vessel so user-mode code can open \\.\vessel.
It does not enforce any restrictive ACL. Any process that can open the device (including low-integrity processes in many configurations) can send IOCTLs.
Core IOCTLs and what they do
| IOCTL | Purpose | Danger level |
|---|---|---|
IOCTL_VESSEL_VERSION | Return a magic version value | Low |
IOCTL_VESSEL_SYSROUTINE | Resolve a kernel export by name via MmGetSystemRoutineAddress | Medium |
IOCTL_VESSEL_ALLOC | Allocate NonPagedPool (or NonPagedPoolExecute if size flag is set) | High |
IOCTL_VESSEL_FREE | Free previously allocated pool | Medium |
IOCTL_VESSEL_GETPHYS | Translate virtual → physical address | Medium |
IOCTL_VESSEL_WRITEPHYS | Map physical memory with MmMapIoSpace and write to it | High |
IOCTL_VESSEL_READVIRT | Read arbitrary kernel virtual memory (addresses above MmHighestUserAddress) | Critical |
IOCTL_VESSEL_WRITEVIRT | Write arbitrary kernel virtual memory | Critical |
IOCTL_VESSEL_CALL | Call any kernel address with up to 4 arguments and return the result | Critical |
IOCTL_VESSEL_EPROCESS | Resolve PID → EPROCESS pointer via PsLookupProcessByProcessId | High |
The most dangerous control is IOCTL_VESSEL_CALL. Combined with the allocation and write primitives an attacker can:
- Allocate executable NonPagedPool.
- Write shellcode into that pool.
- Call the shellcode address with arbitrary arguments.
There is zero validation that the target function pointer points to legitimate, non-paged, executable code. This is a classic “arbitrary kernel call” primitive.
Driver implementation notes
DriverEntrycreates the device and symbolic link, sets every major function to the same dispatch routine, and registers an unload routine.- The dispatch routine handles
IRP_MJ_CREATE/CLOSE/CLEANUPby simply completing them successfully (soCreateFileworks). - All interesting work happens on
IRP_MJ_DEVICE_CONTROLusing METHOD_BUFFERED IOCTLs. - Read/write virtual memory only allows addresses above user space (
MmHighestUserAddress). That is a very weak check; it still gives full kernel read/write. - The call primitive uses a simple
__fastcallfunction pointer cast and a__try/__exceptto avoid an instant bugcheck if the call crashes.
This is intentionally a teaching driver. A real vulnerable signed driver found in the wild would look different, but the primitives it would expose are often the same: arbitrary read, arbitrary write, or arbitrary call.
The Rootkit client
The client (rootkit_client.exe) talks exclusively to the vessel driver. It never loads its own kernel code. Everything is done through the IOCTL interface.
Hardcoded EPROCESS offsets (BSOD risk)
1
2
3
4
5
#define OFF_UNIQUE_PROCESS_ID  0x440
#define OFF_ACTIVE_LINKS       0x448
#define OFF_TOKEN              0x4B8
#define OFF_PROTECTION         0x87A
#define OFF_DEBUG_PORT         0x578
These offsets are for Windows 10 builds 19041 / 19045.
On any other build (21H2, 22H2, Windows 11, etc.) writing to the wrong offsets corrupts kernel memory and usually produces an immediate BSOD. Always verify offsets with WinDbg (dt nt!_EPROCESS UniqueProcessId ActiveProcessLinks Token Protection DebugPort) before running this on a different build.
Helper functions
r64/w64/w8– thin wrappers aroundVesReadVirtMem/VesWriteVirtMem.GetEprocess– asks the driver for theEPROCESSaddress of a given PID.EnableDebugPrivilege– enablesSeDebugPrivilegesoOpenProcesshas a better chance against protected processes.FindPidByName/ResolveTarget– resolve a process name or numeric PID.
Process Hiding (DKOM)
Classic Direct Kernel Object Manipulation:
- Read the
ActiveProcessLinksLIST_ENTRY (Flink + Blink) of the target. - Unlink the process from the doubly-linked list by patching the previous process’s Flink and the next process’s Blink.
- Save the original Flink/Blink so the process can be re-linked later (important – leaving a process unlinked and then terminating it can cause a bugcheck during teardown).
After unlinking, the process disappears from Task Manager, tasklist, Process Explorer (when looking at the normal process list), etc. It is still alive, still has its handles, and still appears in the object manager / handle table.
The client also has a careful exit path (ReLinkBeforeExit / ReInsertAfterSystem) that re-inserts the process after the System process (PID 4) before the client itself exits. This avoids the classic “unlinked process dies → bugcheck” problem.
Protected Process Light (PPL)
Windows stores a protection level in the Protection field of EPROCESS (a single byte in this build).
0x51= Windows Light0x61= WinTcb Light (the level used by many Microsoft and anti-malware components)
Writing 0x61 into the field makes the process extremely hard to open with PROCESS_TERMINATE or to attach a debugger to from user mode. The client uses this both for self-protection and (in reverse) by clearing the field before trying to kill a target.
Debug Port Nullification
Writing zero to DebugPort detaches any existing kernel debugger and prevents normal user-mode debuggers from attaching. Another classic anti-analysis technique.
Token stealing (optional elevation)
When run with --elev the client copies the token pointer from the System process (PID 4) into its own EPROCESS, preserving the reference-count bits in the low nibble. This is the classic “steal SYSTEM token” technique. It is powerful but also one of the riskier operations; a wrong offset or concurrent token reference can easily BSOD the machine.
Process Termination
The kill path is more sophisticated than a simple TerminateProcess:
- Strip any PPL protection from the target (write 0 to the Protection byte).
- Try
OpenProcess(PROCESS_TERMINATE). - If that fails, temporarily steal the SYSTEM token, open the handle while running as SYSTEM, then restore the original token.
- Resolve
ZwTerminateProcessvia the driver and call it directly from kernel context with the obtained handle.
This combination can terminate many processes that normal user-mode code cannot touch.
Hard-coded kill list
1
2
3
4
5
6
7
8
9
10
11
12
13
14
static const WCHAR* g_killList[] = {
    L"EPHost.exe",
    L"EPSecurityConsole.exe",
    L"EPSecurityConsoleUI.exe",
    L"ksde.exe",
    L"ksdeui.exe",
    L"EPHost.Integrity.exe",
    L"EPSecurityService.exe",
    L"EPProtectedService.exe",
    L"EPUpdateService.exe",
    L"bdredline.exe",
    L"EPIntegrationService.exe",
    NULL
};
These are legitimate Bitdefender Endpoint Security / GravityZone process names. The client is not exploiting a vulnerability in Bitdefender; it is simply demonstrating that once you have arbitrary kernel read/write + call you can terminate almost any user-mode process, including ones that are protected by PPL or running as SYSTEM.
Important warning: this is not a 0-day or a reliable real-world bypass of modern Bitdefender. It is a teaching demonstration of what a rootkit with kernel primitives can do.
Auto-run / Watchdog mode
When started with no arguments (or with --elev) the client:
- Hides itself from the process list.
- Raises its own protection level to WinTcb Light (
0x61). - Clears its own DebugPort.
- Optionally steals the SYSTEM token.
- Enters a loop that every 500 ms:
- Walks the kill list and terminates any matching processes.
- Calls
ReassertSelfto re-hide itself and re-apply PPL if something tried to undo the changes.
ReassertSelf is the self-healing part. If a defensive tool re-links the process into the active process list or clears the PPL byte, the next tick undoes that change. This makes simple “find and kill the rootkit” scripts much less effective.
On Ctrl+C / console close the client carefully re-links itself into the process list before exiting so the system stays stable.
Diagnostic and test modes
selftest– writes known values to Protection and DebugPort on itself, reads them back, and performs a hide, so you can verify that the DKOM and write primitives actually stick.diag <name|pid>– dumps the interesting EPROCESS fields so you can compare them against WinDbg.- Individual commands (
hide,unhide,ppl,unppl,nodbg,kill,self) for manual testing.
Putting it together
- Build and load
vessel.sys(test-signing mode or a vulnerable signed driver in a real attack). - Run the client. It opens
\\.\vesseland starts issuing IOCTLs. - The driver gives the client arbitrary kernel virtual read/write and the ability to call any kernel function.
- With those primitives the client performs classic rootkit operations: DKOM process hiding, PPL elevation, debug-port stripping, token stealing, and reliable process termination.
- The watchdog loop keeps the client alive and keeps killing the listed EDR processes.
This is the essence of modern BYOVD rootkits: you do not need to write your own signed kernel driver. You just need one vulnerable signed driver that gives you the right primitives, and then all the classic techniques become available again from user mode.
Final notes
- Offsets are build-specific. Wrong offsets = BSOD.
- Leaving a process unlinked and then terminating it (or letting the system tear it down) is a common way to bugcheck. Always re-link before exit.
- PatchGuard, HVCI, and modern EDRs make pure unsigned rootkits much harder, which is exactly why the industry shifted to abusing legitimate signed drivers.
- This code is for research and understanding. Running it on a production machine or against real security products without authorization is a bad idea.
how to install and exploit it you’r self?
- change the offsets to you’r own
- compile both driver and rootkit ( you must have SDK and WDK installed)
- for testing enable test-sign-mode
- laod the driver
- test the exploit
That is the full picture of how a simple vulnerable driver + a user-mode client can implement the classic rootkit playbook in a BYOVD scenario.
Now you know why these techniques are still relevant even after Microsoft locked the kernel down.
i hope you enjoyed the reading have a nice day or night or afternoon